 To begin the set-up for this Ident, having already organized the ironing board and iron's physics the week previous, all I needed to do was to bring Si into the Lounge from the Kitchen area (grouping all his limbs and bones into 'alien_complete' was a great idea at least)
The green line in front of Si shows the new 'path_constraint' that I added for him to be following towards the position of the 'board
 Happy with the frames that Si will move in to begin the action of ironing, I brought in the ironing equipment and re-sized it to a scale that would make sure that Si's arms wouldn't be able to reach too far upwards or downwards and risk causing problems with the skin modifier
All that would be needed was for his arms to carry out a smooth motion of back and forth along the t-shirt(as the image shows,the body properties are also in place)

Having arranged the items that would be in the scene to the positions where I wanted them, I then adjusted the view in 'Perspective' to get an idea of where the camera would be relative to the height and room-position using the slow zoom inwards towards Si. To the right of the image, the outside of the model is visible, showing up black in the render - I needed to fill that 'dead-space'
 I decided to mirror the method I had used for the other view out of the kitchen window: find the ideal image (in this case, a moon- landing image with the rover in the mid-ground and hills further back...) and apply this to an 'Elevated_Plane', adjusting the rotational angle backwards slightly to compensate for perspective and then, to get the effect of solid floor, 'clone' this and then lay the plane flat and join up the texture with the original (tiling may need adjustment too to get the materials connected)
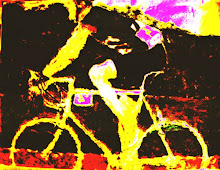
 ^Here is a rendered representation of the camera view as shown in the second previous image.
Note the outside now has the decent scenic view that the camera will hold as it pans towards Si^

For the lounge's camera path, I thought it most efficient to 'clone' the original kitchen path and alter the vertices to fit in with the planned route around the lounge
By keeping the 'Vertex_Type' as 'linear', I was able to move vertex simultaneously, thus keeping a smooth path for the camera for follow without any sudden alterations
 Fixing the Sci-Fi material on the t-shirt meant reapplying the texture. I had to modify the angle of the texture and reduce the U and V tiling for it to centre (incidentally, the un-rendered image here bears no resemblance to the rendered image!)
Using the 'Cropping/Placement' tool, I removed any excess background to the side and above the lettering, necessary to produce the next image below
 ^The final stages of the camera's path will show this image here. Notice how, having altered the tiling and placement, the material has applied in such a way that the creases at the arms are apparent alongside the text of the logo itself^
 Unknown to me, the reactor tool under 'Utilities' needed to be set as to begin the timing for the animation to begin from starting at frame 1 and ending at frame 300 - the length of the Ident
I needed to make sure the whole item was set up because once Max had begun 'Create_Animation', there was no option to undo
The image here shows how the shirt hangs over the edge of the 'board exactly as I had set it up to

The situation meant that constraints I had come across in the design of Si and the subsequent arrangement of his bones and furniture in his home would now cause a few issues that I would have to work around
The main problem that I could account for was that the timing of the iron's rising, falling and general motion around the table was confined to the ultimate reach of Si's arms, as shown in this image
 Experimenting slightly before confirming any definite decisions, I found that the majority of the positioning of the arms and relative actions on the iron would come from rotating and elevating the bones situated on the fingers
An action I wasn't prepared for and certainly caused a little frustration when attempting to select said bones in the midst of all the other objects that I couldn't lock either (this would mean hiding and unhiding each unselected item by name!)

I did cringe a handful of times when assessing how Si's body material would contort itself to cope with the manoeuvres taking place with his arms and fingers
I had planned a basic set-piece whereby the iron would be picked up, shifted to the second arm, pushed away and brought towards Si again, only to then be placed onto its rear end as the camera would sweep over the 'board and reveal the logo on the shirt...
 ^This close-up shows how, as each movement was placed onto the fingers, extra attention needed to be paid to the state of the resultant distortion to the 'skin' and potential unrepairable damaged caused by a mis-click which then found its way into the final animation without notice
Making each grip onto the objects and how that would cause them to react was also tough to keep constant throughout this process^
 ^It was within the final frames of the ironing session that I decided to figure out if, after all this work, there was the chance an unexplainable error could cause the Reactor to detect a 'Collision' with the iron and shirt (this has happened before, bearing in mind!), rendering the animation unusable: fortunately, the use of the 'Preview_Animation' button showed me that there were no errors to speak of^
Disconcerting though it was, I had to leave the object-based side of the animation alone to make time for the camera set-up
As with the washing up Ident and what I had planned for the cleaning Ident likewise, the camera would begin at the archway into the lounge and sweep around the room, making sure to take in all the space-age furniture that had so many weeks spent on it for sheer originality, and then slowly pan towards Si
This image shows that exact point in the animation, around 200 frames in
 The section here where the camera advances towards the ironing board and where Si is standing was important in so much as timing the camera travel and position had been to as exact as I could manage in relation to the movement that was continuing at the 'board
Also of note was the view out of the entrance archway where I attempted to maintain similar use of exterior features as had been used for the 'Washing-Up Ident', the 'moon-landing' shot capturing the Sci-Fi detail and persona of the channel in a nutshell perhaps...
 ^I'll admit that I was apprehensive to use the Dope Sheet when altering the camera's movements, purely based on the concept that there would be every chance the four tracks and relative curves could be mistimed to the keys that have been set and perhaps caused a whole lot of trouble, meaning I would end up doing all the adjustments manually anyway. Using it, there was no trouble at all - I saw the points at which there was a sudden dip or peak in the motion and gradually evened them all out without a hint of frustration^
 ^The last 20 frames involved rotating the camera to reveal the Sci-Fi logo facing Si.
I did discover that, by leaving on 'Auto_Key', any adjustments made to the vertices's of the 'Camera_path' by elevating or lengthening it would actually change form as the animation progress, effectively giving the camera the ability to follow an advancing path without any constraints with a path being too short or not focusing on the necessary area^
 ^Before I felt like leaving this alone to move onto the third animation, I wanted to explore an idea. Because the shirt and iron are in view of the camera's lens when the clip starts and so are dropped into place by the Reactor in frame one in full view, I tried to rotate the camera's opening shot to reduce the reactor appearing so suddenly in the viewers sight. As the image shows, I would have to expose far too much of the exterior walls, effectively destroying the illusion of the exterior scenes created by myself to present the view of Si being on the moon and on a planet in space! ^
Happy as I am to be finished with two Idents, I will have doubts about all three involving timings as too fast or slow, which I can hopefully rectify in Premiere which allows me to alter the speed/duration (by a percentage scale), which could then mean I will achieve my targets timescales of between 10 and 15 seconds, thereby including all music and sound effects without having to cut them too short or extend them otherwise...

No comments:
Post a Comment