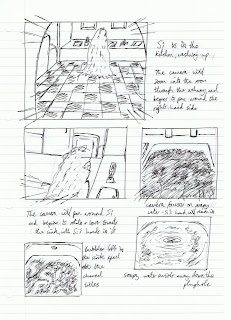
The first will involve Si the Alien washing up in the kitchen. He will put a plate into the drying rack on the side and, (there are two possible versions: whichever is easiest!) as he goes to pull out the plug, the soapy water drains away and the soap suds left in the bowl will spell out Sci - Fi
Here is a small storyboard to demonstrate;
The other two ideas involve Si in the lounge where, in the second, he is ironing a pair of his undercrackers, burns a mark into them, pulls up the iron and places it onto the ironing board, where the Sci-Fi channel title will appear at the bottom.
The last one, again in the lounge, Si will be either dusting or hoovering (I'm sure him dusting will be alot easier to demonstrate!) and, as he cleans, he will chuck up dust/dirt in the air and the titles will appear in either the air or on the floor/shelve surface.
I shall update the storyboards for these ideas as and when I continue...
The Tutorial
Creating characters which are intended to become animated means applying the use of bones to the characters limbs, thus allowing them to be manipulated. Each 'bone' that is created should be named appropriately as so to avoid any mistakes, as well as creating a series of 'bones' that are measured for your desired purpose e.g. a upper-arm and fore-arm, with a wrist joint and finger joints for a typical homo-sapient, but other characters may need other parts too...
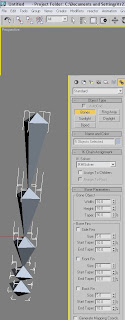 ^Upon choosing 'Mechanics' along the top menu, you are greeted with five options, with the 'bone' option chosen here. Using a 'click-and-drag' system, I created this string of bones that are immediately connected to each other, and act as if they were tokens part of a typical human arm ( options with this item include altering the dimensions of a particular bone and adding in 'fins' to any of them for ease of movement/selection, as well as adding bulk to the required limb is you should wish^
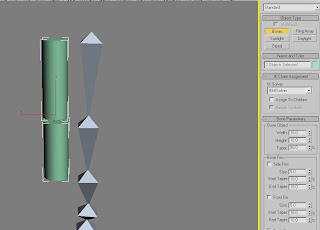 ^ Creating a cylinder and lining it up against the upper-arm 'bone' (which, incidentally, I pulled upwards to straighten them out ready for this step!), I began to clone the cylinder the same number of times as there was 'bones', lining each one up against its requisite 'bone' (I also later learned that all I needed was one cylinder/cube per limb, rather than cloning several)^
 ^Ignoring the sentence I finished the last point with, the next I took was to integrate each cylinder with the bone I had lined it up next to - I had thought that having a separate object for each bone would have allowed a greater degree of flexibility, but this isn't that case (3DS Max is clever enough to contort a single object through many deformations, without the need for too many at once!)^
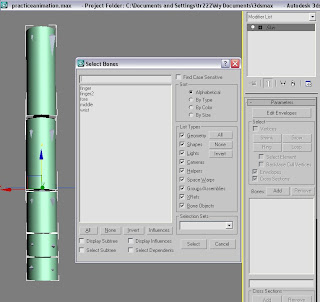 ^Once the cylinders are lined up and all equal in spacing and are considered parallel, I then went to the modifier list and chose the skin modification, to which I was presented with the window of options on the right of the image above. I then went to 'Add' and selected the bones in the scene (you can see the easily-memorable names I gave them!) and clicked 'Select' - there are many check/un-check options of how to order the bones if there are many of you are not sure which have been used or not...^
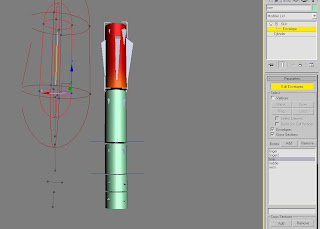 ^Finally, the 'Edit Envelopes' button. This handy tool allows precise alterations to each section of the cylinder that you have chosen and, as shown in the image, I have checked the fins options from the previous window to show how exactly the bones will change with this option engaged. The vertices and loops of the bones will alter in accordance and in direct relation with the envelope modifications - definitely a tool which can come in useful when their are alot of bones attached with the HI Solver ( a device which allows the joints of each of the bones to connect with each other, so pulling one up will directly alter the others in that chain...^
I will present a handful more posts within this week, especially since I have completed around 60% of Si and the Alien now, and since the stage for the animations contains two rooms, one of which will be used for two of the Idents, I may be able to say that the constructions of them are almost halfway too....
Here is a small storyboard to demonstrate;

The other two ideas involve Si in the lounge where, in the second, he is ironing a pair of his undercrackers, burns a mark into them, pulls up the iron and places it onto the ironing board, where the Sci-Fi channel title will appear at the bottom.
The last one, again in the lounge, Si will be either dusting or hoovering (I'm sure him dusting will be alot easier to demonstrate!) and, as he cleans, he will chuck up dust/dirt in the air and the titles will appear in either the air or on the floor/shelve surface.
I shall update the storyboards for these ideas as and when I continue...
The Tutorial
Creating characters which are intended to become animated means applying the use of bones to the characters limbs, thus allowing them to be manipulated. Each 'bone' that is created should be named appropriately as so to avoid any mistakes, as well as creating a series of 'bones' that are measured for your desired purpose e.g. a upper-arm and fore-arm, with a wrist joint and finger joints for a typical homo-sapient, but other characters may need other parts too...
 ^Upon choosing 'Mechanics' along the top menu, you are greeted with five options, with the 'bone' option chosen here. Using a 'click-and-drag' system, I created this string of bones that are immediately connected to each other, and act as if they were tokens part of a typical human arm ( options with this item include altering the dimensions of a particular bone and adding in 'fins' to any of them for ease of movement/selection, as well as adding bulk to the required limb is you should wish^
 ^ Creating a cylinder and lining it up against the upper-arm 'bone' (which, incidentally, I pulled upwards to straighten them out ready for this step!), I began to clone the cylinder the same number of times as there was 'bones', lining each one up against its requisite 'bone' (I also later learned that all I needed was one cylinder/cube per limb, rather than cloning several)^
 ^Ignoring the sentence I finished the last point with, the next I took was to integrate each cylinder with the bone I had lined it up next to - I had thought that having a separate object for each bone would have allowed a greater degree of flexibility, but this isn't that case (3DS Max is clever enough to contort a single object through many deformations, without the need for too many at once!)^
 ^Once the cylinders are lined up and all equal in spacing and are considered parallel, I then went to the modifier list and chose the skin modification, to which I was presented with the window of options on the right of the image above. I then went to 'Add' and selected the bones in the scene (you can see the easily-memorable names I gave them!) and clicked 'Select' - there are many check/un-check options of how to order the bones if there are many of you are not sure which have been used or not...^
 ^Finally, the 'Edit Envelopes' button. This handy tool allows precise alterations to each section of the cylinder that you have chosen and, as shown in the image, I have checked the fins options from the previous window to show how exactly the bones will change with this option engaged. The vertices and loops of the bones will alter in accordance and in direct relation with the envelope modifications - definitely a tool which can come in useful when their are alot of bones attached with the HI Solver ( a device which allows the joints of each of the bones to connect with each other, so pulling one up will directly alter the others in that chain...^
I will present a handful more posts within this week, especially since I have completed around 60% of Si and the Alien now, and since the stage for the animations contains two rooms, one of which will be used for two of the Idents, I may be able to say that the constructions of them are almost halfway too....

No comments:
Post a Comment